
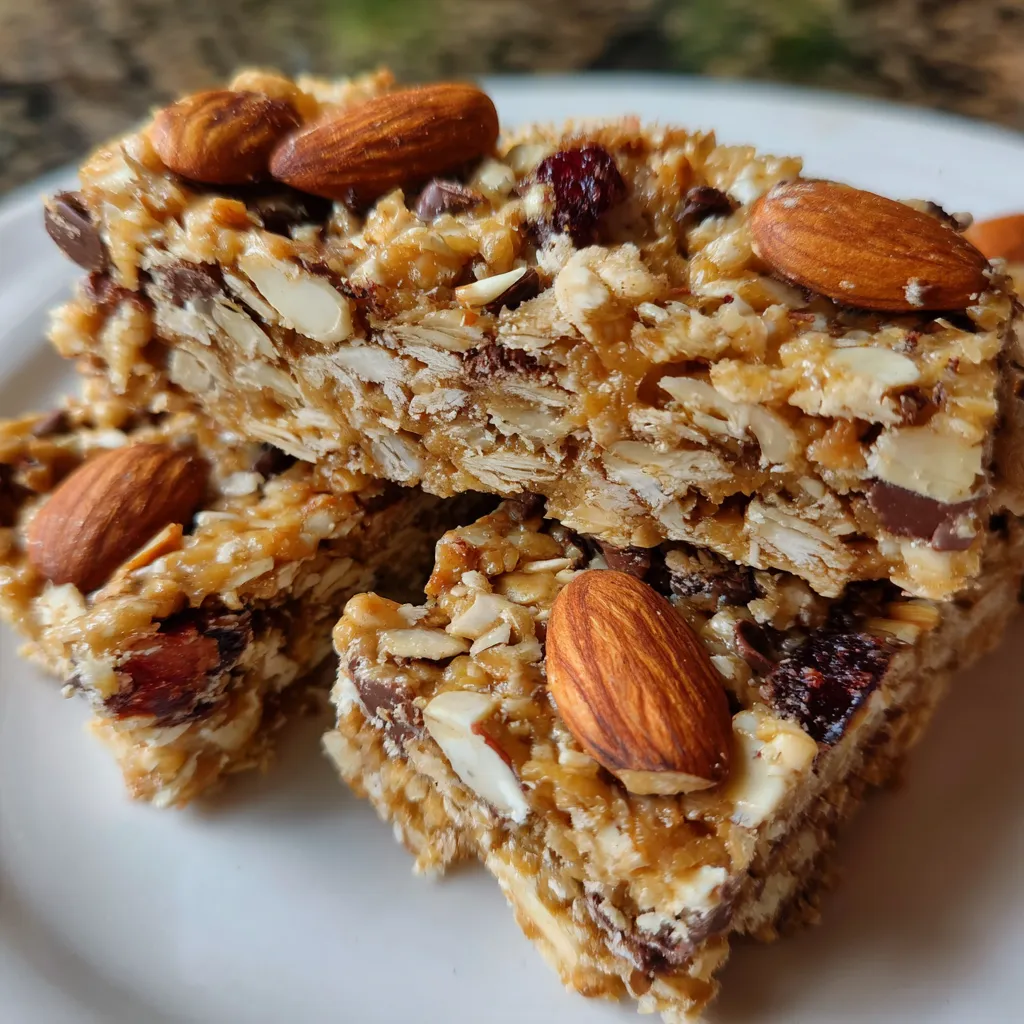
No Bake Granola Bars bring together chewy oats, crunchy almonds, and hidden chocolate chips in fridge-set bars that are ready for a quick bite anytime. This simple blend of warm honey and peanut butter coats oats, almonds, and rice cereal before chilling into nut-studded squares that satisfy sweet cravings without turning on the oven. With minimal prep and no baking, these bars are perfect for busy mornings, snack attacks, or lunchboxes.
Key Ingredients
These bars rely on a handful of pantry staples to create a perfect balance of chewiness, crunch, and sweetness.
- 1 1/2 cup rolled oats: Chewy base that provides hearty texture and fiber for lasting energy.
- 1/2 cup chopped almonds: Crunchy nuts adding protein and a nutty flavor contrast.
- 1/2 cup crispy rice cereal: Light, airy crunch that keeps bars tender and prevents heaviness.
- 1/3 cup honey: Natural sweetener and binder that helps bars stick together.
- 1/4 cup peanut butter: Creamy binder with rich flavor and added protein.
- 2 tablespoon brown sugar: Deep sweetness and a hint of caramel that enhances the honey.
- 1 teaspoon vanilla extract: Flavor booster that rounds out the sweetness.
- 1/4 teaspoon salt: Balances and amplifies all the sweet and nutty flavors.
- 1/4 cup mini chocolate chips: Melty pockets of chocolate for an irresistible finishing touch.
How To Make No Bake Granola Bars
Making these No Bake Granola Bars is a breeze: you’ll melt your binders, mix in the dry ingredients, fold in chocolate chips, then chill until set. With just one pan, a saucepan, and an hour or two in the fridge, you’ll have snackable bars that come together in about 10 minutes of hands-on time. Follow each step carefully for chewy, perfectly bound bars.
1. Line an 8×8 inch pan with parchment paper, leaving an overhang on two sides for easy removal later.
2. In a medium saucepan over low heat, combine honey, peanut butter, and brown sugar.
3. Stir the mixture constantly with a heatproof spatula until it melts and becomes smooth, about 2 to 3 minutes.
4. Remove the saucepan from heat and stir in vanilla extract and salt until fully incorporated.
5. In a large bowl, mix rolled oats, chopped almonds, and crispy rice cereal until evenly combined.
6. Pour the warm peanut butter mixture over the dry ingredients and mix vigorously until everything is well coated.
7. Fold in mini chocolate chips quickly before the mixture cools to keep them from melting.
8. Transfer the mixture to the prepared pan and press firmly into an even layer using the back of a spatula or measuring cup.
9. Refrigerate for at least 2 hours or until the bars are fully set and firm to the touch.
10. Use the parchment overhang to lift the slab out of the pan and cut into squares with a sharp knife.
Serving Suggestions
Once your No Bake Granola Bars are chilled and cut, it’s time to serve them in style. These versatile bars pair beautifully with a variety of accompaniments, making them perfect as a breakfast treat, afternoon pick-me-up, or post-workout snack. Here are four easy ideas to elevate your granola bar experience:
- Pair with Greek yogurt for added creaminess and a protein boost at breakfast.
- Drizzle with melted dark chocolate for an indulgent touch that still feels homemade.
- Serve alongside a tropical fruit salad to brighten the snack table with fresh flavors.
- Pack as a portable snack in lunchboxes or hiking packs for on-the-go energy.
Tips For Perfect No Bake Granola Bars
Creating the perfect no-bake bars is all about temperature, timing, and pressing firmly. These tips will help you achieve chewy, well-bound bars every time, even if you’re new to homemade snack making:
- Store bars in an airtight container in the refrigerator for up to one week.
- For a gluten-free version, use certified gluten-free oats and cereal.
- Swap almonds for walnuts or pecans based on preference.
- Add dried fruit or seeds for extra texture and flavor.
How To Store It
Keeping your No Bake Granola Bars fresh and tasty is simple with the right storage methods. Whether you’re planning ahead for the week or stashing extras for the freezer, these tips will preserve that signature chew and crunch:
- Refrigerator: Store bars in an airtight container for up to one week to maintain freshness and firmness.
- Freezer: Layer bars between parchment paper in a freezer-safe bag or container for up to 3 months.
- Thawing: Remove frozen bars to the refrigerator or let them sit at room temperature for about 30 minutes before enjoying.
- Portion Packs: Wrap individual bars in parchment paper to prevent sticking and make grab-and-go snacking effortless.
Frequently Asked Questions
Here are answers to common questions about crafting and storing your No Bake Granola Bars:
- How long does it take to prepare and set these no-bake granola bars?
Active prep time is about 10 minutes—including lining the pan, heating the honey-peanut butter mixture, and mixing ingredients—plus at least 2 hours of refrigeration to allow the bars to fully set. Plan for a total of roughly 2 hours and 10 minutes before cutting and serving.
- What substitutions can I make for peanut butter and almonds?
You can swap peanut butter for almond butter, cashew butter, or sunflower seed butter. If using a different nut or seed butter, keep the ratio the same but note the flavor and consistency may vary slightly. For the chopped almonds, you can replace them with chopped walnuts, pecans, sunflower seeds, or pumpkin seeds to suit dietary needs or taste preferences.
- How can I ensure the granola bars hold together well and don’t crumble?
Make sure the honey, peanut butter, and brown sugar are fully melted and smooth before pouring over the dry ingredients. When transferring the mixture to the pan, press it down very firmly with the back of a spatula or the bottom of a flat measuring cup to eliminate air pockets and create a compact layer. Refrigerating for the full 2 hours—and not cutting them while still warm—helps maintain the bars’ structural integrity.
- What’s the best way to store these bars, and how long will they keep?
Once cut, store the bars in an airtight container in the refrigerator for up to one week. If you need longer storage, you can freeze them in a freezer-safe container or bag for up to 3 months. Thaw frozen bars in the refrigerator or at room temperature for about 30 minutes before enjoying.
- How do I adapt this recipe to be gluten-free?
Use certified gluten-free rolled oats and certified gluten-free crispy rice cereal to ensure no cross-contamination with gluten-containing grains. All other ingredients—honey, nut butter, brown sugar, vanilla extract, salt, and chocolate chips—are naturally gluten-free, but double-check labels if you have a severe sensitivity.
- Can I add other mix-ins like dried fruit or seeds without affecting the texture?
Yes. You can fold in up to 1/3 cup of dried fruit such as cranberries, raisins, or chopped apricots, and up to 2 tablespoons of chia seeds, flaxseeds, or hemp hearts. Add these right after pouring the warm peanut butter mixture over the dry ingredients and mix quickly so the bars still bind properly.
- Why did my mini chocolate chips melt into the bars, and how can I prevent that?
Chocolate chips can begin to melt if added while the peanut butter mixture is too hot. To prevent melting, remove the saucepan from heat, stir in vanilla extract and salt, then let the mixture cool for 30–45 seconds before folding in the chips. Working quickly but off direct heat will help the chips retain their shape.
What Makes This Special
These No Bake Granola Bars are special because they bring together chew, crunch, and melty chocolate in one effortless snack—no oven required! They’re a fantastic beginner-friendly recipe, perfect for busy mornings or sweet cravings, and you can customize them with swaps and add-ins to suit any taste. Feel free to print this article and save it for later, then let me know in the comments how your bars turned out or if you have any questions. Enjoy experimenting and happy snacking!
Print
No Bake Granola Bars
- Prep Time: 10 mins
- Cook Time: 5 mins
- Total Time: 15 minutes
- Yield: 12 servings
- Category: Breakfast
Description
A simple blend of warm honey and peanut butter coats oats, almonds, and rice cereal before chilling into chewy, nut-studded bars with melty chocolate chips.
Ingredients
- 1 1/2 cup rolled oats
- 1/2 cup chopped almonds
- 1/2 cup crispy rice cereal
- 1/3 cup honey
- 1/4 cup peanut butter
- 2 tablespoon brown sugar
- 1 teaspoon vanilla extract
- 1/4 teaspoon salt
- 1/4 cup mini chocolate chips
Instructions
- Line an 8×8 inch pan with parchment paper, leaving overhang on two sides.
- In a medium saucepan over low heat, combine honey, peanut butter, and brown sugar.
- Stir the mixture constantly until it melts and becomes smooth, about 2 to 3 minutes.
- Remove the saucepan from heat and stir in vanilla extract and salt.
- In a large bowl, mix rolled oats, chopped almonds, and crispy rice cereal.
- Pour the warm peanut butter mixture over the dry ingredients and mix until well coated.
- Fold in mini chocolate chips quickly before the mixture cools.
- Transfer the mixture to the prepared pan and press firmly into an even layer.
- Refrigerate for at least 2 hours or until set.
- Use the parchment overhang to lift the bars out of the pan and cut into squares.
Notes
- Store bars in an airtight container in the refrigerator for up to one week.
- For a gluten-free version, use certified gluten-free oats and cereal.
- Swap almonds for walnuts or pecans based on preference.
- Add dried fruit or seeds for extra texture and flavor.