
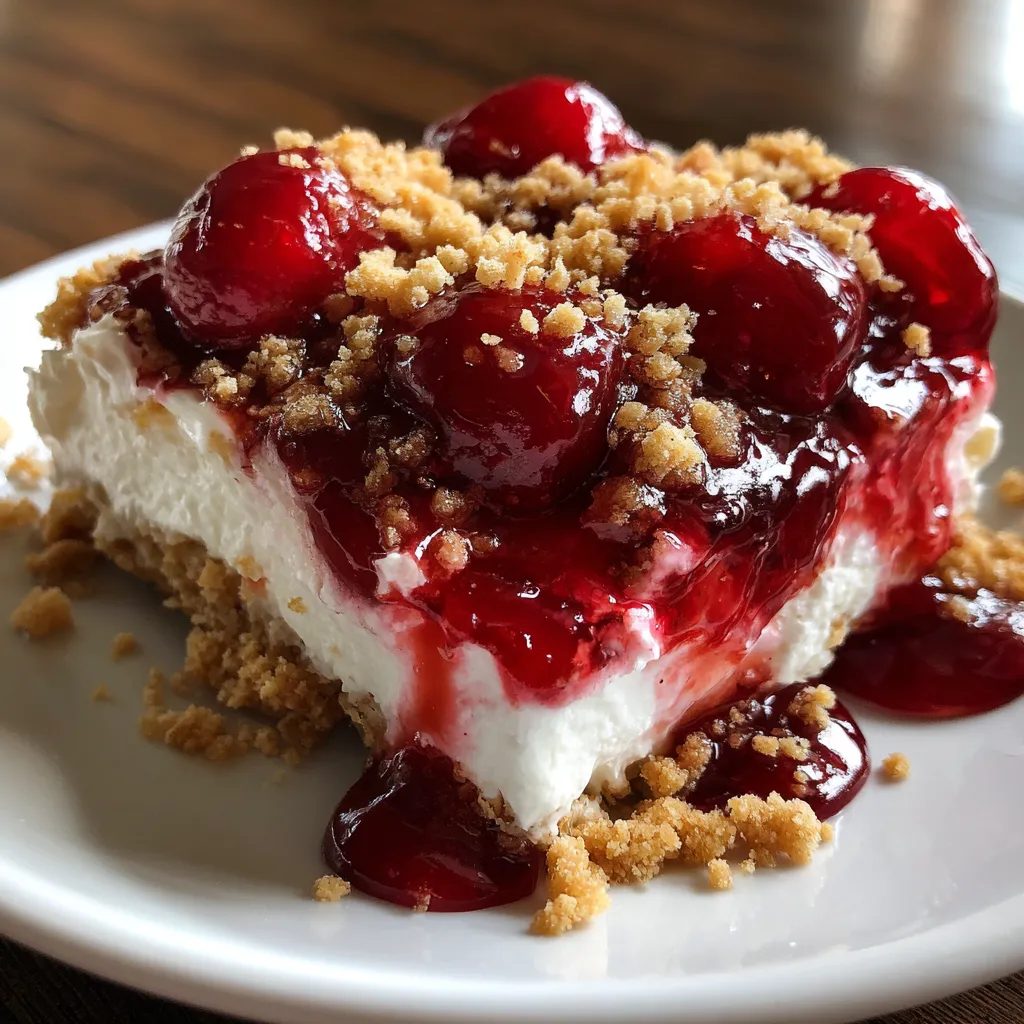
Ready for a dessert that’s as easy as it is indulgent? No-Bake Cherry Yum Yum Dessert layers a buttery graham cracker crust with a cloudlike cream cheese–whipped filling, crowned by glossy cherry pie topping. Perfect for summer get-togethers, picnics, or a no-fuss sweet fix at home, this beginner-friendly treat comes together in minutes and chills to creamy perfection. Grab your mixing bowls and let’s dive into the ultimate cool-and-creamy cherry delight!
Key Ingredients
Before you start, gather these pantry staples and dairy goodies for maximum yum:
- 1 cup graham cracker crumbs: crisp, buttery base that sets the stage for every layer.
- 1/4 cup granulated sugar: adds just the right amount of sweetness and helps bind the crust.
- 1/4 cup unsalted butter, melted: enriches the crust and seals the crumbs into a firm foundation.
- 8 ounces cream cheese, softened: creates a silky, tangy core for your dessert.
- 1/4 cup powdered sugar: sweetens and smooths the cream cheese filling.
- 1 teaspoon vanilla extract: brightens the cream layer with warm, comforting flavor.
- 1 cup heavy whipping cream, cold: whips up into fluffy peaks for a light, airy texture.
- 21 ounces cherry pie filling: provides that glossy, fruit-forward crown with sweet-tart cherry bursts.
How To Make No-Bake Cherry Yum Yum Dessert
This no-bake wonder relies on simple layering and chilling to achieve its dreamy texture. You’ll start by crafting a crunchy crust, then whip up a cloud-light cream cheese layer, and finish with a vibrant cherry topping. Each step is straightforward—just pay attention to chilling times for the best results.
1. In a mixing bowl, combine the graham cracker crumbs, granulated sugar, and melted butter, stirring until the crumbs are evenly moistened and resemble wet sand.
2. Press the crumb mixture firmly into the bottom of an 8×8-inch pan using the back of a spoon or a flat measuring cup, then chill in the refrigerator for 10 minutes to set the crust.
3. In a separate bowl, beat the softened cream cheese, powdered sugar, and vanilla extract with an electric mixer on medium speed until smooth and creamy, scraping down the sides as needed.
4. Using a chilled bowl and beaters, whip the heavy cream until stiff peaks form, then gently fold the whipped cream into the cream cheese mixture in three additions, keeping as much air as possible.
5. Spread the whipped cream cheese layer evenly over the chilled crust, smoothing the top with an offset spatula for clean slices later.
6. Carefully spoon the cherry pie filling over the cream layer and use a spatula to distribute it in an even, glossy layer.
7. Cover the pan with plastic wrap and refrigerate for at least 4 hours or overnight—this resting time lets the layers meld and firm up beautifully.
Serving Suggestions
Once your No-Bake Cherry Yum Yum Dessert is perfectly chilled, it’s time to serve it up in style. Whether you’re hosting a backyard barbecue or craving a solo sweet escape, these ideas will make each slice shine:
- Serve each slice on a chilled plate to keep the dessert from warming too quickly.
- Add a dollop of fresh whipped cream alongside the slice for extra cloud-like richness.
- Garnish with a sprig of fresh mint or a few whole cherries for a pop of color and herbal brightness.
- Pair with a light, refreshing iced tea or sparkling lemonade to balance the sweet-tart flavors.
Tips For Perfect No-Bake Cherry Yum Yum Dessert
With a few friendly pointers, you’ll nail this recipe every time. Below are your go-to cheats and tweaks to elevate the dessert:
- Freeze for a firmer dessert: Pop the assembled pan into the freezer for 1 hour before serving to get extra-clean slices and a slightly frostier texture.
- Substitute pie fillings: Swap the cherry with strawberry or blueberry pie filling for a fun twist on the classic layers.
- Adjust sweetness: Taste the cream cheese mixture before folding in the whipped cream—reduce or add powdered sugar to suit your palate.
- Garnish creatively: Serve chilled and finish each slice with fresh mint leaves or a sprinkle of graham cracker crumbs for a stylish flourish.
How To Store It
Storing your No-Bake Cherry Yum Yum Dessert properly keeps every bite tasting fresh and delicious. Follow these simple methods to maintain texture and flavor:
- Refrigerate tightly: Cover the pan with plastic wrap or an airtight lid and refrigerate for up to 3 days, ensuring the filling stays creamy and the crust stays firm.
- Freeze for longer: For storage up to one month, wrap the entire pan securely in plastic wrap and then foil to prevent freezer burn.
- Thaw correctly: Move the frozen dessert to the refrigerator and let it thaw for 2–3 hours before slicing to preserve its layered structure.
- Keep slices protected: Store individual slices in an airtight container with parchment paper between layers if you want grab-and-go servings.
Frequently Asked Questions
Here are answers to the most common queries about this cherry-topped delight:
- Q: How long does it take to prepare and chill the No-Bake Cherry Yum Yum Dessert?
Active preparation takes about 20 minutes—10 minutes for making the crust and pressing it into the pan, and another 10 minutes to mix the cream cheese and whipped cream layers. After assembly, the dessert must chill in the refrigerator for at least 4 hours or overnight for best results. If you’d like a firmer set, add an extra hour in the freezer before serving.
- Q: Can I use a different crust or adapt the graham cracker base?
Yes. You can substitute crushed digestive biscuits, vanilla wafers, or shortbread cookies for graham cracker crumbs, using the same 1 cup measure. Make sure to finely crush your cookies, mix with 1/4 cup granulated sugar and 1/4 cup melted butter, then press firmly into the pan. If you prefer a nutty crust, replace up to half the crumbs with ground almonds or pecans.
- Q: How do I ensure the whipped cream layer folds in smoothly without deflating?
Use a very cold bowl and beaters, and make sure your heavy whipping cream is thoroughly chilled. Whip until stiff peaks form, then gently cut through the center of the whipped cream with a spatula, lift and fold the cream cheese mixture over the whipped cream, rotating the bowl as you fold. This minimizes air loss and keeps the mixture light and fluffy.
- Q: What storage methods work best, and how long does this dessert keep?
Cover the assembled dessert tightly with plastic wrap or an airtight lid and refrigerate for up to 3 days. For longer storage, freeze for up to one month—wrap the pan securely in plastic and foil. Thaw in the refrigerator for 2–3 hours before serving.
- Q: Can I customize the fruit layer with other pie fillings?
Absolutely. Swap the cherry pie filling for strawberry, blueberry, raspberry, or even apple pie filling. You can also use a mix of fresh berries lightly sweetened with sugar and a splash of lemon juice—just be sure the filling isn’t too watery to prevent soaking the cream layer.
- Q: How can I adjust the sweetness of the cream cheese layer?
Before folding in the whipped cream, taste the cream cheese mixture. If you prefer it less sweet, reduce the powdered sugar to 2 tablespoons. For extra sweetness, add up to 1/3 cup powdered sugar or a drizzle of honey. Stir gently to maintain a smooth consistency.
- Q: Why is it important to chill the crust before adding the cream layer?
Chilling the crust for 10 minutes firms up the butter and helps the crumbs set into a solid base. This prevents the crust from crumbling when you spread the cream cheese layer on top and ensures clean slices when serving.
What Makes This Special
This No-Bake Cherry Yum Yum Dessert is the perfect mash-up of breezy prep and show-stopper style. The interplay of a buttery graham cracker foundation, a silky cream cheese-whipped middle, and a jewel-bright cherry topping creates a multi-textured marvel that’s as fun to make as it is to devour. Feel free to print and stash this recipe for your next summer party or last-minute dessert emergency. Let me know in the comments how it turned out, share your flavor swaps, or drop any questions if you need help whipping it up!
Print
No-Bake Cherry Yum Yum Dessert
- Prep Time: 25 mins
- Total Time: 25 minutes
- Yield: 9 servings
- Category: Desserts
Description
Buttery graham crumbs form a crisp base beneath a cloudlike cream cheese-whipped layer, crowned with vibrant cherry pie filling. Each bite is a cool contrast of textures and sweet-tart cherry bursts that make summer snacking dreamy.
Ingredients
- 1 cup graham cracker crumbs
- 1/4 cup granulated sugar
- 1/4 cup unsalted butter melted
- 8 ounces cream cheese softened
- 1/4 cup powdered sugar
- 1 teaspoon vanilla extract
- 1 cup heavy whipping cream cold
- 21 ounces cherry pie filling
Instructions
- In a mixing bowl combine graham cracker crumbs, granulated sugar, and melted butter until evenly moistened.
- Press the crumb mixture into the bottom of an 8×8 inch pan to form a firm crust and chill for 10 minutes.
- In a separate bowl beat cream cheese, powdered sugar, and vanilla extract until smooth and creamy.
- In a cold bowl whip the heavy cream until stiff peaks form, then gently fold into the cream cheese mixture.
- Spread the whipped cream cheese layer evenly over the chilled crust.
- Pour the cherry pie filling over the cream layer and spread evenly.
- Cover and refrigerate for at least 4 hours or overnight before serving.
Notes
- For a firmer dessert, freeze for 1 hour before serving.
- Substitute strawberry or blueberry pie filling for variety.
- Taste the cream layer before assembly and adjust sweetness if needed.
- Serve chilled and garnish with fresh mint leaves if desired.