
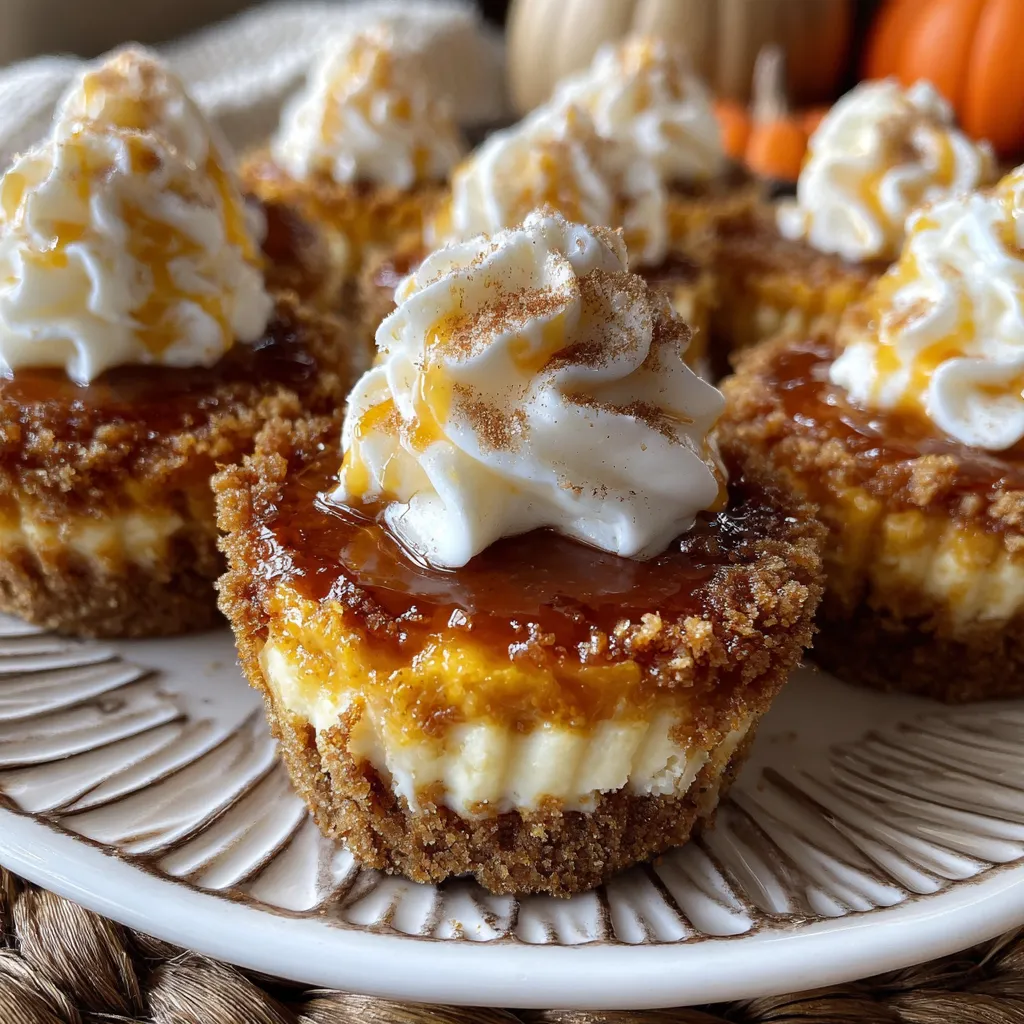
Pumpkin Cheesecake Cups are the ultimate mini fall indulgence, blending a spiced pumpkin filling with velvety cheesecake in a crunchy graham crust. These handheld treats glow with autumn flavor and are perfect for cozy evenings or holiday gatherings. Petite enough to pop in your mouth, they’re as adorable as they are delicious—topped with billowy whipped cream and a cinnamon sprinkle for that extra touch of festive flair. Give them a try and watch everyone light up at the first bite!
Key Ingredients
Before diving in, let’s gather our simple yet flavorful components for these Pumpkin Cheesecake Cups:
- 1 1/2 cups graham cracker crumbs: Provides a crunchy, buttery base that holds up to the creamy filling.
- 1/4 cup granulated sugar: Sweetens the crust and helps it bind.
- 6 tbsp unsalted butter, melted: Binds the crumbs together and adds rich flavor.
- 8 oz cream cheese, softened: The creamy foundation of the cheesecake layer—make sure it’s room temperature.
- 1/3 cup granulated sugar: Sweetens the cheesecake filling without overpowering the pumpkin.
- 1/3 cup pumpkin puree: Brings that signature fall flavor and smooth texture.
- 1 large egg: Binds the filling and gives it a custardy finish.
- 1 tsp vanilla extract: Adds warmth and depth to the cheesecake batter.
- 1/2 tsp ground cinnamon: Infuses cozy spice notes throughout.
- 1/4 tsp ground ginger: Gives a bright, zesty kick.
- 1/8 tsp ground nutmeg: Rounds out the spice blend with earthy sweetness.
- pinch salt: Balances flavors and enhances sweetness.
- 1/2 cup whipped cream: For that light, cloud-like topping.
- 1 pinch ground cinnamon: A final sprinkle to make every bite pop.
How To Make Pumpkin Cheesecake Cups
These little delights come together in two parts—crafting the graham crust and whipping up the luscious pumpkin cheesecake filling—then baking and chilling them to perfection. Follow each step closely and you’ll have a tray of perfectly set, slightly jiggly mini cheesecakes that are dreamy and festive.
1. Preheat oven to 325°F to ensure even baking.
2. In a bowl, combine graham cracker crumbs, 1/4 cup granulated sugar, and melted butter until the mixture resembles wet sand.
3. Press the crumb mixture firmly into the bottom of a 12-cup muffin pan lined with paper liners, creating an even base.
4. Bake crusts for 5 minutes, then remove and let cool slightly so the filling doesn’t melt the crust.
5. In a separate bowl, beat cream cheese and 1/3 cup granulated sugar on medium speed until completely smooth and lump-free.
6. Add pumpkin puree, egg, vanilla extract, ground cinnamon, ground ginger, ground nutmeg, and salt; mix until just combined—avoid overmixing.
7. Spoon the filling evenly over the cooled crusts, filling each cup nearly to the top.
8. Bake for 15 minutes or until edges are set and centers are still slightly jiggly, indicating a creamy interior.
9. Allow cups to cool to room temperature on a wire rack, then refrigerate for at least 2 hours to fully set.
10. Top each cup with whipped cream and sprinkle with ground cinnamon just before serving.
Serving Suggestions
These Pumpkin Cheesecake Cups are adorable on any dessert table. Whether it’s a casual family night or a holiday feast, here are four fun ways to present them:
- Drizzle with warm caramel sauce for an extra sweet twist and a glossy finish.
- Garnish with a toasted pecan half perched on the whipped cream for crunch and visual appeal.
- Serve on a rustic wooden board and dust the platter with extra cinnamon for a cozy display.
- Pair with a small espresso cup or spiced latte for a coffee shop–style treat at home.
Tips For Perfect Pumpkin Cheesecake Cups
Getting these mini cheesecakes just right is easier than you think. A few simple tricks ensure a silky texture and picture-perfect cups every time:
- Ensure cream cheese is fully softened to prevent lumps.
- Avoid overbaking to maintain a creamy center.
- Refrigerate cheesecake cups for at least 2 hours before serving.
- Store leftovers in an airtight container for up to 3 days.
How To Store It
Proper storage will keep your Pumpkin Cheesecake Cups tasting fresh and dreamy for days:
- Refrigerate in an airtight container: Place cups upright in a container with a tight lid; they’ll stay creamy for up to 3 days.
- Use parchment or wax paper: If stacking cups, place a sheet between layers to prevent sticking and protect the whipped cream topping.
- Freeze for longer storage: Omit whipped cream before freezing. Freeze cups in a single layer until solid, then transfer to a freezer-safe container for up to 1 month.
- Thaw gently: Move frozen cups to the refrigerator overnight, then bring to slightly above fridge temperature before serving for the best texture.
Frequently Asked Questions
Here are answers to common Pumpkin Cheesecake Cups questions:
- Q: How long does it take to prepare and chill these Pumpkin Cheesecake Cups?
It takes about 15 minutes to prepare the crust and another 10 minutes to mix and spoon in the filling. Baking requires 5 minutes for the crust plus 15 minutes for the cheesecake cups, then cooling to room temperature (around 20 minutes) and at least 2 hours of refrigeration. In total, plan for roughly 3 hours from start to serving.
- Q: What’s the best way to ensure the cream cheese filling is lump-free?
Make sure your cream cheese is at room temperature for at least 30 minutes before starting. Use an electric mixer on medium speed to beat the cream cheese and sugar until completely smooth, scraping down the bowl sides. Add the pumpkin puree and spices gradually and mix just until combined to avoid overworking the batter.
- Q: Can I substitute the graham cracker crust or use a gluten-free option?
Yes. You can swap graham cracker crumbs for gluten-free graham crackers or crushed gluten-free cookies. Simply measure 1½ cups of the alternative crumbs, combine with ¼ cup sugar and 6 tablespoons melted butter, then press into liners as directed. Baking time for the crust remains 5 minutes.
- Q: How do I prevent the cheesecake cups from cracking or overbaking?
Bake at 325°F and remove the cups when the edges are set but the centers still jiggle slightly. Avoid opening the oven door during baking. If you notice the tops browning too quickly, lower the temperature by 10°F. Cooling them gradually—from oven to counter to refrigerator—also helps prevent cracking.
- Q: What variations can I make to the spices or flavor profile?
You can adjust or omit spices based on preference. For a chai twist, add ¼ teaspoon ground cardamom and a pinch of cloves. To deepen pumpkin flavor, stir in 1 tablespoon maple syrup with the pumpkin puree or fold in finely chopped toasted pecans to the crust for added texture.
- Q: How should I store leftover Pumpkin Cheesecake Cups, and how long do they last?
Store the cups in an airtight container in the refrigerator for up to 3 days. Place a piece of wax or parchment paper between layers to prevent sticking. Bring to slightly above refrigerator temperature before serving for optimal creaminess.
- Q: Can I prepare these cups in advance or freeze them?
You can assemble, bake, cool, and refrigerate the cups up to 24 hours ahead. If freezing, omit the whipped cream topping, freeze the cooled cups in a single layer until solid, then transfer to a freezer-safe container. They keep for up to 1 month. Thaw overnight in the refrigerator before serving and add whipped cream just before plating.
What Makes This Special
These Pumpkin Cheesecake Cups hit all the right notes: buttery graham crust, spiced pumpkin filling, creamy cheesecake, and a fluffy whipped cream crown. They’re small enough to feel indulgent without going overboard, making them perfect for gatherings or a solo fall treat. The texture contrast—crisp base to silky interior—will have everyone asking for seconds. Feel free to print and save this recipe for cozy nights ahead. Let me know in the comments if you give them a whirl or have any questions—happy baking!
Print
Pumpkin Cheesecake Cups
- Prep Time: 20 mins
- Cook Time: 20 mins
- Total Time: 40 minutes
- Yield: 12 servings
- Category: Desserts
Description
Petite spiced pumpkin cheesecake fills buttery graham crusts, baked till just set and chilled until silk-smooth. Crown each cup with billowy whipped cream and a cinnamon sprinkle for a cozy fall bite.
Ingredients
- 1 1/2 cups graham cracker crumbs
- 1/4 cup granulated sugar
- 6 tbsp unsalted butter, melted
- 8 oz cream cheese, softened
- 1/3 cup granulated sugar
- 1/3 cup pumpkin puree
- 1 large egg
- 1 tsp vanilla extract
- 1/2 tsp ground cinnamon
- 1/4 tsp ground ginger
- 1/8 tsp ground nutmeg
- pinch salt
- 1/2 cup whipped cream
- 1 pinch ground cinnamon
Instructions
- Preheat oven to 325°F.
- In a bowl combine graham cracker crumbs, 1/4 cup granulated sugar and melted butter.
- Press crumb mixture firmly into the bottom of a 12-cup muffin pan lined with paper liners.
- Bake crusts for 5 minutes, then remove and let cool slightly.
- In a separate bowl beat cream cheese and 1/3 cup granulated sugar until smooth.
- Add pumpkin puree, egg, vanilla extract, ground cinnamon, ground ginger, ground nutmeg and salt; mix until just combined.
- Spoon the filling evenly over the cooled crusts.
- Bake for 15 minutes or until edges are set and centers are still slightly jiggly.
- Allow cups to cool to room temperature, then refrigerate for at least 2 hours.
- Top each cup with whipped cream and sprinkle with ground cinnamon before serving.
Notes
- Ensure cream cheese is fully softened to prevent lumps.
- Avoid overbaking to maintain a creamy center.
- Refrigerate cheesecake cups for at least 2 hours before serving.
- Store leftovers in an airtight container for up to 3 days.