
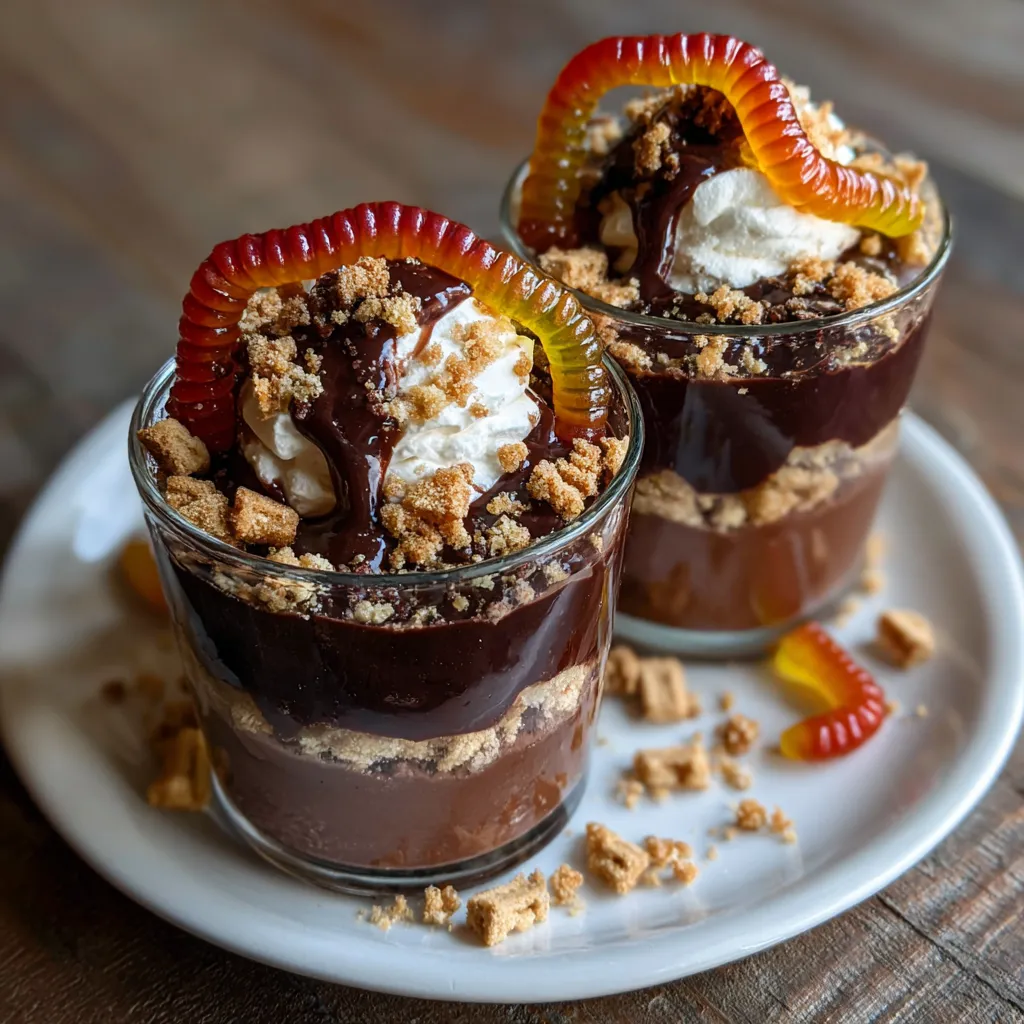
Get ready to dig into some seriously fun Dirt and Worms Pudding Cups, where creamy chocolate pudding meets crunchy cookie crumbs and squirming gummy worms in every playful layer. This no-bake dessert is beginner-friendly and perfect for Halloween gatherings or any day you want a giggly surprise. Let’s dive in and bring these spooky treats to life!
Key Ingredients
Here’s what you’ll need to whip up these Dirt and Worms Pudding Cups. Each ingredient plays a crucial role in creating those gooey, crunchy, and squishy layers.
- 2 packages instant chocolate pudding mix: Creates a rich and creamy chocolate layer that sets beautifully.
- 4 cups cold milk: Provides the liquid base to whisk the pudding mix into a smooth, velvety texture.
- 2 cups vanilla wafer crumbs: Adds a sweet, crunchy “dirt” layer that contrasts the silky pudding.
- 1 cup gummy worms: Brings fun, chewy pops of color and a playful surprise in every bite.
How To Make Dirt and Worms Pudding Cups
Ready to get a little messy? Making Dirt and Worms Pudding Cups is as simple as layering and chilling. With just a few easy steps—whisking, spooning, and stacking—you’ll build spooky cups starring creamy chocolate, crunchy crumbs, and wriggly gummy friends.
1. In a large bowl, combine the instant chocolate pudding mix and cold milk. Use a whisk to mix for about two minutes until the mixture is completely smooth and thick, with no lumps remaining.
2. Spoon 1 tablespoon of vanilla wafer crumbs into the bottom of each serving cup, gently pressing down to create a firm “dirt” base.
3. Add a layer of chocolate pudding over the crumbs until each cup is about one-third full, smoothing the top with the back of a spoon.
4. Arrange a few gummy worms on top of the pudding layer, tucking them slightly into the mix for a realistic wormy effect.
5. Repeat the layers—crumbs, pudding, and gummy worms—until the cups are nearly full, ending with a final sprinkling of crumbs or a worm on top.
6. Refrigerate the assembled pudding cups for at least 30 minutes before serving to allow the layers to set and the flavors to meld.
Serving Suggestions
These Dirt and Worms Pudding Cups look adorable on the table, but you can take your presentation up a notch with simple serving tweaks. Whether you’re hosting a Halloween bash or a backyard picnic, these ideas will make your dessert the star of the show—no messy setups required!
- Serve in clear cups: Showcase the distinct layers of shiny chocolate pudding and crunchy cookie “dirt” by using transparent glass or plastic cups for full spooky effect.
- Top with whipped cream: Add a dollop of airy whipped cream and perch a gummy worm on top for an extra touch of creepiness and texture.
- Use themed spoons: Offer small plastic shovels or colorful spoons to play up the “digging” aspect and delight kids (and adults).
- Garnish with edible “rocks”: Scatter a few chocolate-covered raisins or mini chocolate chips on each cup to resemble pebbles among the dirt and worms.
Tips For Perfect Dirt and Worms Pudding Cups
Achieving picture-perfect Dirt and Worms Pudding Cups is all about some clever tweaks and fun variations. These handy tips will help you get that jaw-dropping contrast between velvety pudding and crunchy dirt, plus you can customize color, texture, and storage to suit any party theme. Follow these pointers, and you’ll have guests squealing with delight—no spooky lab required!
- For extra crunch, use crushed chocolate sandwich cookies instead of vanilla wafers.
- Customize with different colored gummy candies for a fun twist.
- Prepare the layers in clear cups for a spooky dirt effect.
- Store leftovers covered in the refrigerator for up to two days.
How To Store It
Once the party’s over, you’ll want to keep these eerie delights fresh and delicious. Proper storage protects that satisfying crunch of the cookie crumbs and keeps the gummy worms looking their best. Follow these simple methods to stash your Dirt and Worms Pudding Cups without losing any of their creepy charm.
- Refrigerate in airtight containers: Transfer cups to a large sealed container or cover the original cups with plastic wrap to prevent moisture from softening the crumbs.
- Keep individual cups covered: If serving in clear plastic cups with lids, snap them on tightly to lock in freshness and avoid fridge odors.
- Store for up to two days: Enjoy the best texture and flavor within 48 hours, as the cookie crumbs will gradually absorb moisture over time.
- Avoid freezing: Freezing can alter the pudding’s texture and make the crumbs soggy, so stick to refrigeration only.
Frequently Asked Questions
Got questions about creating the ultimate dirt-and-worms treat? I’ve gathered some of the most common queries so you can dig in worry-free.
- Q: How long does it take to prepare Dirt and Worms Pudding Cups?
A: It takes about 15 minutes to prepare these pudding cups, which includes whisking the instant chocolate pudding mix with cold milk for about two minutes, crushing the vanilla wafers (if not pre-crumbled), and layering the crumbs, pudding, and gummy worms in each cup. You’ll also need at least 30 minutes of refrigeration time for the layers to set before serving.
- Q: How many servings does this recipe yield?
A: This recipe makes approximately 8 individual pudding cups if you use standard 8-ounce serving cups. Adjust the number of servings by using smaller or larger cups, or by dividing the ingredients accordingly—each cup uses about 1 tablespoon of wafer crumbs per layer and enough pudding to fill it one-third at a time.
- Q: Can I make Dirt and Worms Pudding Cups ahead of a party, and how should I store them?
A: Yes, you can assemble the cups up to two hours ahead of time and refrigerate them, covered with plastic wrap or airtight lids. Leftover cups can be stored in the refrigerator for up to two days. Keep them covered to prevent the wafer crumbs from absorbing moisture and becoming overly soggy.
- Q: What substitute ingredients can I use if I want a different flavor or texture?
A: You can swap the vanilla wafer crumbs for crushed chocolate sandwich cookies to add extra chocolatey crunch, or use graham cracker crumbs for a milder sweetness. If you don’t have gummy worms, try gummy bears or other colorful gummy shapes. For a dairy-free version, choose a non-dairy instant chocolate pudding mix and use almond, soy, or oat milk.
- Q: How do I achieve the best “dirt” effect with the layers?
A: For a striking dirt effect, use clear cups and make sure your vanilla wafer crumbs are finely crushed—no large chunks. Press each crumb layer gently with the back of a spoon before adding the pudding so the layers stay distinct. Chill the pudding before layering if it’s too runny, then assemble quickly to prevent the crumbs from dissolving.
- Q: What fun variations can I try to customize this recipe?
A: You can add a dollop of whipped cream on top along with a gummy worm for extra flair, or sprinkle mini chocolate chips between layers for added texture. Try layering crushed mint cookies with green-tinted pudding for a monster-mash theme, or use rainbow gummy candies for a colorful rainbow dirt cup.
What Makes This Special
Dirt and Worms Pudding Cups hit the sweet spot between spooky fun and easy entertaining—no baking required! The crunchy cookie crumbs mimic garden soil, while the gummy worms bring a cheeky twist that’s sure to make everyone laugh. Whether you’re whipping these up for a kid’s party or a Halloween get-together, you can mix and match colors and textures to suit any theme. Print this article, save it for later, and don’t be shy—drop a comment below if you try it or have questions. Happy digging!
Print
Dirt and Worms Pudding Cups
- Prep Time: 15 mins
- Total Time: 15 minutes
- Yield: 8 servings
- Category: Desserts
Description
Creamy chocolate pudding meets crunchy cookie crumbs and squirming gummy worms in playful cups. Chilled until set, each spoonful delivers rich cocoa flavor and a chewy, sweet surprise.
Ingredients
- 2 packages instant chocolate pudding mix
- 4 cups cold milk
- 2 cups vanilla wafer crumbs
- 1 cup gummy worms
Instructions
- In a large bowl combine instant chocolate pudding mix and cold milk and whisk for about two minutes until smooth and thick.
- Spoon 1 tablespoon of vanilla wafer crumbs into the bottom of each serving cup.
- Add a layer of chocolate pudding over the crumbs until it’s about one-third full.
- Arrange a few gummy worms on top of the pudding layer.
- Repeat layers of vanilla wafer crumbs, pudding, and gummy worms until the cups are nearly full.
- Refrigerate the pudding cups for at least 30 minutes before serving to allow layers to set.
Notes
- For extra crunch, use crushed chocolate sandwich cookies instead of vanilla wafers.
- Customize with different colored gummy candies for a fun twist.
- Prepare the layers in clear cups for a spooky dirt effect.
- Store leftovers covered in the refrigerator for up to two days.