
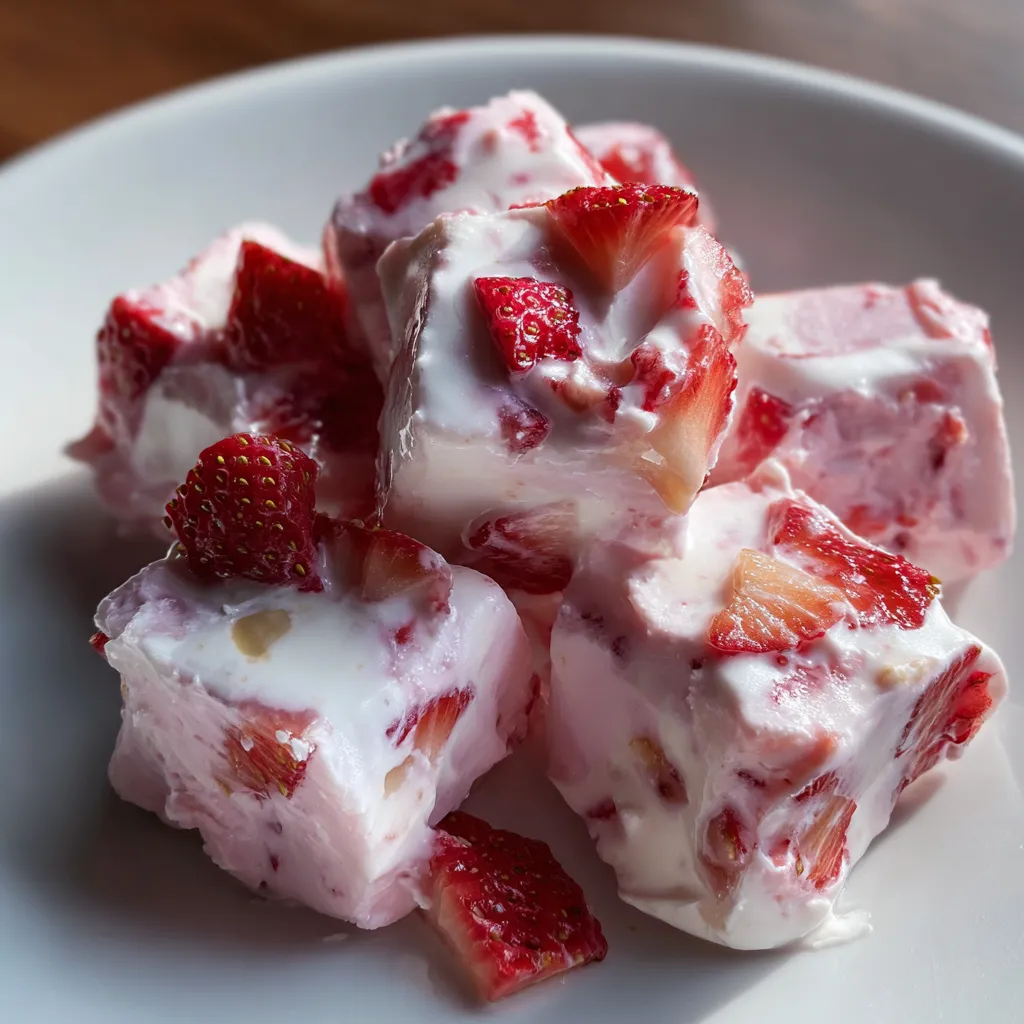
Strawberry Yogurt Bites are little frozen pops of creamy Greek yogurt swirled with honey and dotted with juicy strawberry bursts—perfect bite-sized treats to brighten any day. They’re easy to whip up, fun to munch on, and a healthy snack that feels like dessert. Whether you need a quick make-ahead snack, a crowd-pleasing party appetizer, or a guilt-free pick-me-up, these colorful bites have got you covered. Let’s dive in and chill out with this beginner-friendly recipe!
Key Ingredients
Before we get freezing, let’s gather the simple ingredients that make these bites so delightful:
- 1 cup plain Greek yogurt: Thick, creamy base that provides protein and tangy flavor.
- 2 tablespoons honey: Natural sweetener that balances the tartness and adds a smooth floral note.
- 1 teaspoon vanilla extract: A splash of warm, aromatic sweetness to enhance the yogurt’s flavor.
- 1 cup diced strawberries: Fresh fruit bursts that add juiciness, color, and a bright berry taste.
How To Make Strawberry Yogurt Bites
You’re just a few easy steps away from freezer-ready yogurt snacks! In this section, we’ll blend, fold, fill, and freeze to create perfectly portioned bites that hold their shape and deliver big flavor. These instructions guide you through creating a smooth mixture, evenly distributing the strawberries, and using the right molds so your bites pop right out once frozen.
1. In a medium bowl, whisk together the Greek yogurt, honey, and vanilla extract until completely smooth—no lumps should remain.
2. Gently fold in the diced strawberries with a spatula, ensuring each piece is evenly coated without smashing.
3. Spoon the mixture into a silicone mold or mini muffin tin, filling each cavity about three-quarters full to allow for slight expansion.
4. Use the back of a spoon or a small offset spatula to smooth the tops, creating even surfaces for easy removal.
5. Transfer the mold to the freezer and let the bites freeze until fully solid, about 2 hours.
6. Once firm, carefully pop the yogurt bites out of the mold and transfer them to a freezer-safe container for storage.
Serving Suggestions
When it’s time to serve Strawberry Yogurt Bites, get creative! These pops are versatile and can elevate any snack spread:
- Party Platter: Arrange on a chilled tray with fresh mint leaves for a pop of color and garnish.
- Fruit Parfait Bar: Offer alongside granola, nuts, and honey so guests can build custom yogurt parfaits.
- Kids’ Lunchbox: Pack in a small insulated tote with an ice pack for a fun, mess-free treat.
- Summer Picnic: Serve straight from a cooler or insulated bag—perfect for outdoor adventures and beach days.
Tips For Perfect Strawberry Yogurt Bites
A few insider tips will ensure your Strawberry Yogurt Bites come out just right every time. These friendly hints help you tweak sweetness, swap fruits, and keep that perfect texture, so go ahead and experiment:
- Adjust the honey amount to taste for a sweeter or milder flavor.
- Store the bites in an airtight container in the freezer for up to one month.
- You can swap strawberries for blueberries, raspberries, or a mixed berry blend.
- Let the bites sit at room temperature for a few minutes before serving if they are too firm.
How To Store It
Keeping your Strawberry Yogurt Bites fresh and delicious is a breeze with the right approach. Here’s how to maintain their texture and flavor over time:
- Airtight Container: Transfer the frozen bites to a freezer-safe, airtight container to prevent freezer burn.
- Label & Date: Stick a label on the container with the preparation date so you can use them within one month.
- Layer Between Parchment: If stacking, place parchment or wax paper between layers to stop bites from sticking.
- Consistent Freezing Temperature: Store toward the back of the freezer where the temperature stays most stable.
Frequently Asked Questions
Here are quick answers to common questions about Strawberry Yogurt Bites:
- How long does it take to prepare and freeze the Strawberry Yogurt Bites?
It takes about 10 minutes to prepare the mixture—whisking the yogurt, honey, and vanilla, dicing strawberries, and filling the mold—plus about 2 hours in the freezer until the bites are fully solid.
- Can I use a different type of yogurt or sweetener in this recipe?
Yes, you can substitute plain Greek yogurt with regular yogurt for a creamier texture or non-dairy yogurt for a vegan option. You may swap honey for maple syrup or agave nectar; just adjust the amount to taste to maintain the desired sweetness.
- What’s the best way to prevent the yogurt bites from sticking to the mold?
Using a silicone mold is ideal because it offers flexibility for easy removal. If you only have a metal mini muffin tin, lightly grease each cavity with cooking spray or line them with small silicone or paper liners before filling.
- How should I store leftover Strawberry Yogurt Bites, and how long will they keep?
Transfer the frozen bites to an airtight, freezer-safe container or zip-top bag, removing as much air as possible. Stored properly, they will remain at peak quality for up to one month in the freezer.
- Can I use frozen strawberries instead of fresh ones?
Yes, you can use frozen diced strawberries without thawing, but you may see small ice crystals in the mixture. Gently fold them in and proceed; the bites may take a few extra minutes to freeze solid.
- How can I customize the flavor or texture of these bites?
You can fold in small fruit pieces like blueberries or raspberries, add a teaspoon of lemon zest for brightness, stir in finely chopped nuts for crunch, or swirl in a tablespoon of fruit jam before freezing.
- What should I do if the yogurt bites are too hard straight from the freezer?
Let the bites sit at room temperature for 3 to 5 minutes before serving. This softens them slightly, making them easier to bite into without losing their shape.
What Makes This Special
Strawberry Yogurt Bites shine because they blend the creaminess of Greek yogurt with honey’s sweetness and fresh strawberry bursts into a perfectly portable, bite-sized treat. They’re ridiculously simple—no baking required—and endlessly customizable, making them a go-to for snack prep or party spreads. Plus, you can swap berries or sweeteners to suit any taste. Feel free to print this recipe and stash it in your kitchen binder for whenever you need a quick, healthy pick-me-up. If you give it a try, let me know how it went or ask any questions below—I’d love to hear from you!
Print
Strawberry Yogurt Bites
- Prep Time: 15 mins
- Total Time: 15 minutes
- Yield: 12 servings
- Category: Desserts
Description
Creamy Greek yogurt swirls with honey and fresh strawberries, then chills into cool, handheld bites that burst with sweet fruit flavor and smooth texture.
Ingredients
- 1 cup plain Greek yogurt
- 2 tablespoons honey
- 1 teaspoon vanilla extract
- 1 cup diced strawberries
Instructions
- In a medium bowl, whisk together the Greek yogurt, honey, and vanilla extract until smooth.
- Gently fold in the diced strawberries until evenly distributed.
- Spoon the mixture into a silicone mold or mini muffin tin, filling each cavity about three-quarters full.
- Smooth the tops with the back of a spoon or a small offset spatula.
- Transfer the mold to the freezer and freeze until solid, about 2 hours.
- Pop the yogurt bites out of the mold and transfer them to a freezer-safe container.
Notes
- Adjust the honey amount to taste for a sweeter or milder flavor.
- Store the bites in an airtight container in the freezer for up to one month.
- You can swap strawberries for blueberries, raspberries, or a mixed berry blend.
- Let the bites sit at room temperature for a few minutes before serving if they are too firm.