
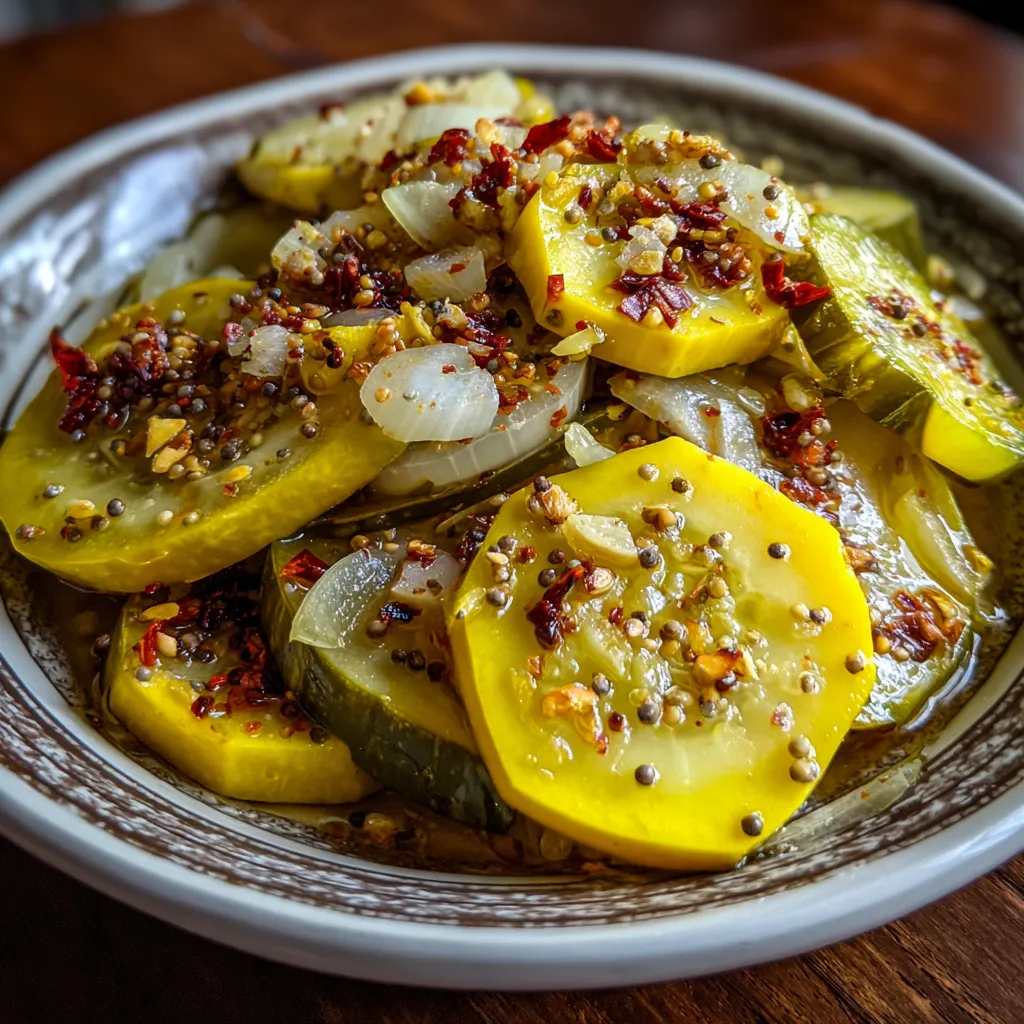
Sweet Yellow Squash Pickles bring bright yellow rounds bathed in a sweet-spiced brine, delivering the perfect balance of tangy, sugary, and warming spice in every crunchy bite. These crisp squash slices soak up vibrant flavors studded with mustard seeds, turmeric, and cloves, creating a satisfyingly crunchy texture that will liven up any meal. Dive in and discover how simple it is to transform everyday squash into a tangy-sweet delight.
Key Ingredients
Here’s what you need to whip up a batch of these tangy-sweet yellow squash pickles. Each ingredient plays a crucial role in creating that signature crunch and flavor.
- 2 pounds yellow squash: crisp rounds that soak up the sweet-spiced brine for a satisfying crunch.
- 1 cup onion: thin slices adding mild sharpness and depth to balance the sweetness.
- 1 cup white vinegar: delivers the tangy kick that’s essential for classic pickling.
- 1 cup water: dilutes the vinegar to the perfect acidity for soaking the vegetables.
- 2 cups granulated sugar: provides sweetness and helps balance the tart vinegar.
- 1 tablespoon pickling salt: enhances flavor without clouding the brine.
- 1 teaspoon mustard seeds: little pops of warming spice in every bite.
- 1 teaspoon celery seeds: aromatic seeds that add a subtle earthy note.
- 1/2 teaspoon turmeric: brightens color and adds a warm, peppery flavor.
- 1/4 teaspoon ground cloves: warm, fragrant spice that complements the sweetness.
- 1/4 teaspoon red pepper flakes: a gentle heat to round out the flavor profile.
How To Make Sweet Yellow Squash Pickles
Turning fresh squash into refrigerator pickles is easier than you think. You’ll prepare and slice your veggies, create a spiced brine, and jar everything for a quick cool-down. After at least 24 hours in the fridge, the flavors truly bloom, yielding crunchy, tangy-sweet pickles you can’t resist.
1. Rinse the yellow squash and slice into 1/4-inch rounds. Peel the onion and thinly slice it for even pickling.
2. In a medium saucepan, combine the white vinegar, water, granulated sugar, pickling salt, mustard seeds, celery seeds, turmeric, ground cloves, and red pepper flakes.
3. Bring the mixture to a boil over medium heat, stirring occasionally until the sugar and salt dissolve completely and the brine becomes clear.
4. Pack the sliced squash and onion tightly into clean jars, pressing down gently and leaving about 1/2-inch headspace at the top.
5. Carefully pour the hot brine over the vegetables, maintaining the 1/2-inch headspace to allow for expansion as the jars cool.
6. Wipe the jar rims clean, secure the lids, and seal tightly. Let the jars cool to room temperature on a heat-safe surface.
7. Transfer the cooled jars to the refrigerator and refrigerate for at least 24 hours—48 hours yields the best flavor.
Serving Suggestions
These Sweet Yellow Squash Pickles are versatile and can brighten up almost any dish. Whether you’re layering them in a sandwich or serving them alongside grilled meats, here are a few fun ways to showcase their crunch and sweet-tangy flavor.
- Sandwich companion: Layer pickles on your favorite sandwiches or burgers for an extra crisp, tangy kick.
- Charcuterie board accent: Arrange them alongside cured meats and cheeses so guests can enjoy a bright, sweet-spiced bite between savory flavors.
- Salad topper: Chop and sprinkle over green salads or grain bowls to add color and crunch.
- Side for grilled dishes: Serve chilled with grilled chicken, fish, or vegetables to balance smoky flavors with a refreshing sweetness.
Tips For Perfect Sweet Yellow Squash Pickles
I’ve found a few tricks that take these pickles from great to absolutely stellar. With just a couple of tweaks, you can dial in the texture and flavor to match your personal taste—whether that means extra crunch, balanced sweetness, or a fruitier tang. These tips are super easy to follow and will help you become a pickling pro in no time!
- Use fresh, firm yellow squash for the best crunch and texture
- Adjust the sugar or vinegar amounts to suit your preferred sweetness or tang
- Store refrigerated pickles in sealed jars and consume within 2 to 3 weeks
- Apple cider vinegar can replace white vinegar for a milder, fruitier flavor
How To Store It
After enjoying that first jar, you’ll want to know how to keep your pickles fresh and crunchy. Proper storage ensures they maintain their tangy-sweet flavor and safety. Here are a few simple methods to store your pickles for maximum enjoyment.
- Refrigerator storage: Keep sealed jars in the coldest part of your fridge to preserve crunch and flavor.
- Clean utensils only: Always use a clean fork or tongs to remove pickles to prevent contamination and extend shelf life.
- Label and date: Mark each jar with the preparation date so you can track freshness and enjoy them within the ideal window.
- Consume within 2–3 weeks: For the best texture and taste, finish your sweet yellow squash pickles within three weeks of making them.
Frequently Asked Questions
Got a few questions about making these pickles? You’re not alone—here are answers to what people often ask!
- Q: How long does it take to prepare these Sweet Yellow Squash Pickles, and when are they ready to eat?
A: It takes about 30 minutes to wash and slice 2 pounds of yellow squash and 1 cup of onion, bring the vinegar, water, sugar, salt, and spices to a boil, and pack the jars. Once sealed and cooled, refrigerate for at least 24 hours so the flavors develop fully; they can be enjoyed after a day but taste best after 48 hours.
- Q: Can I substitute another vinegar for the white vinegar, and how will that affect flavor?
A: Yes. You can replace the 1 cup of white vinegar with 1 cup of apple cider vinegar for a milder, fruitier tang. The pickles will take on a subtle apple note, and the color may be slightly darker. Avoid using very strong vinegars like malt or balsamic, as they can overpower the delicate squash flavor.
- Q: What if I don’t have pickling salt—what can I use instead, and why is pickling salt recommended?
A: Pickling salt is pure granulated salt without anti-caking agents or iodine, so it dissolves clearly and won’t cloud the brine. If you don’t have pickling salt, you can use kosher salt or non-iodized sea salt in a 1:1 ratio. Avoid iodized table salt, which can leave a cloudy brine and alter the taste.
- Q: How should I store these pickles, and how long will they keep?
A: Store the sealed jars in the refrigerator. Because this recipe is for quick refrigerator pickles, not canned goods, consume them within 2 to 3 weeks for optimal crunch and flavor. Always use a clean utensil to remove pickles to prevent contamination.
- Q: How can I adjust the sweetness or tanginess to suit my preference?
A: To reduce sweetness, decrease the granulated sugar by ¼ cup at a time, tasting the brine before pouring. For more tang, add 1 to 2 tablespoons of extra vinegar. You can also experiment by adding a splash of lemon juice or increasing the red pepper flakes for extra zest.
- Q: Why is it important to slice the squash into 1/4-inch rounds and pack the jars tightly?
A: Slicing into uniform 1/4-inch rounds ensures even penetration of the hot brine, resulting in consistent flavor and crunch. Packing the jars tightly keeps the squash and onion submerged under the brine, preventing spoilage and ensuring every slice is pickled equally.
- Q: Can I process these pickles for shelf-stable canning instead of refrigerating?
A: This recipe is formulated as a refrigerator pickle and has not been tested for safe shelf-stable canning. If you wish to can them, you must follow a USDA-approved water-bath canning method, adjust headspace to ½ inch, use proper canning jars and lids, and process for the recommended time to ensure safety.
- Q: What serving suggestions and flavor variations work well with these pickles?
A: Serve them chilled alongside grilled meats, sandwiches, or charcuterie boards. For a spicier kick, stir in extra red pepper flakes before bottling. You can also add a few dill sprigs or replace ground cloves with a cinnamon stick for a warm, aromatic twist.
What Makes This Special
These Sweet Yellow Squash Pickles stand out thanks to their vibrant color, easy refrigerator method, and a sweet-spiced brine that packs a punch without any fuss. The one-day rest brings out the perfect balance of tang, sugar, and gentle heat, so you get that irresistible crunch in every bite. They’re beginner-friendly, require no special equipment, and can be whipped up in under an hour—what’s not to love? Go ahead, print this page, stash it in your recipe binder, and let me know in the comments how yours turned out or if you have any questions—I’m here to help!
Print
Sweet Yellow Squash Pickles
- Prep Time: 15 mins
- Cook Time: 10 mins
- Total Time: 25 minutes
- Yield: 8 servings
- Category: Side Dishes
Description
These pickles showcase crisp yellow squash slices soaked in a sweet, tangy brine studded with mustard seeds, turmeric, and cloves. Each bite pops with vibrant spice and satisfyingly crunchy texture.
Ingredients
- 2 pounds yellow squash
- 1 cup onion
- 1 cup white vinegar
- 1 cup water
- 2 cups granulated sugar
- 1 tablespoon pickling salt
- 1 teaspoon mustard seeds
- 1 teaspoon celery seeds
- 1/2 teaspoon turmeric
- 1/4 teaspoon ground cloves
- 1/4 teaspoon red pepper flakes
Instructions
- Rinse the yellow squash and slice into 1/4-inch rounds. Peel the onion and thinly slice.
- In a saucepan combine white vinegar, water, granulated sugar, pickling salt, mustard seeds, celery seeds, turmeric, ground cloves, and red pepper flakes.
- Bring the mixture to a boil over medium heat, stirring until the sugar and salt dissolve completely.
- Pack the sliced squash and onion tightly into clean jars, leaving about 1/2-inch of headspace.
- Carefully pour the hot brine over the vegetables, maintaining the 1/2-inch headspace.
- Seal the jars with lids and let them cool to room temperature.
- Refrigerate the pickles for at least 24 hours before serving to develop flavor.
Notes
- Use fresh, firm yellow squash for the best crunch and texture
- Adjust the sugar or vinegar amounts to suit your preferred sweetness or tang
- Store refrigerated pickles in sealed jars and consume within 2 to 3 weeks
- Apple cider vinegar can replace white vinegar for a milder, fruitier flavor