
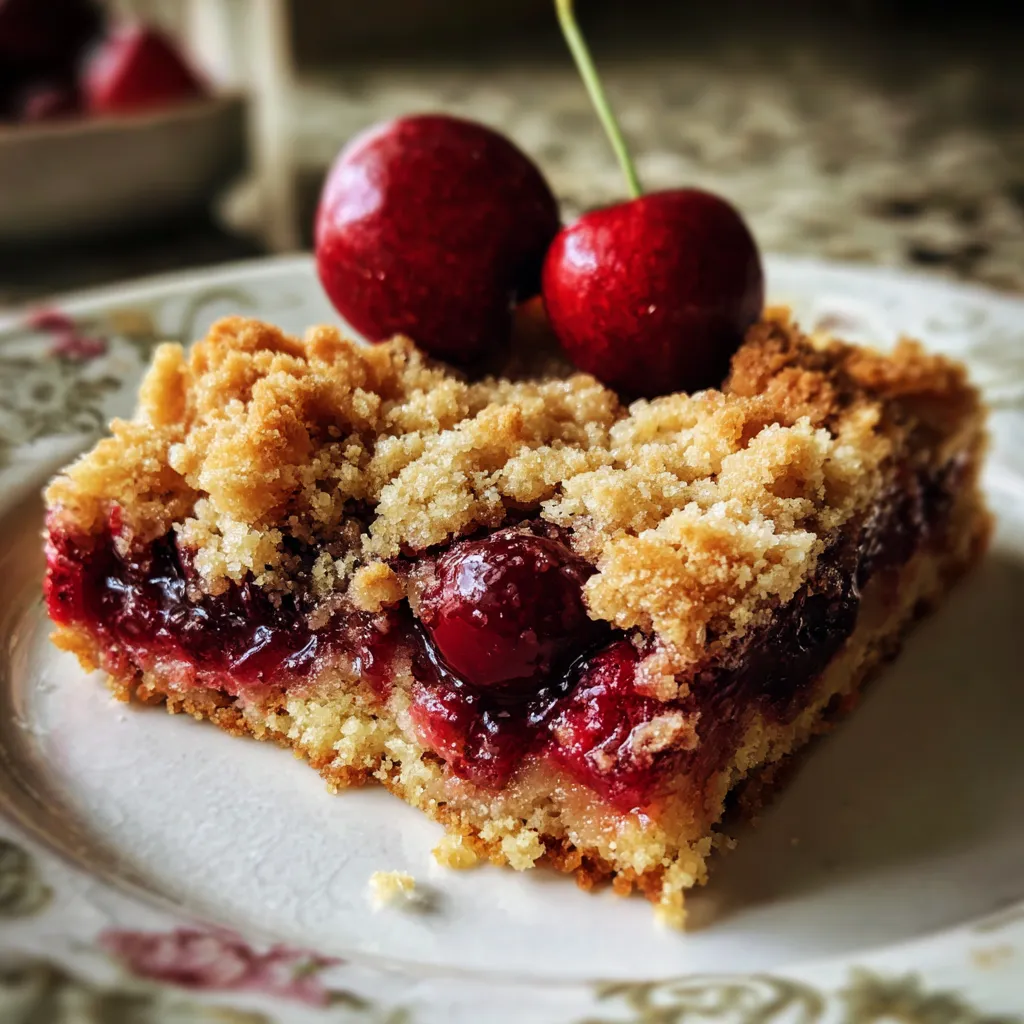
Cherry Crumb Bars let you bite into layers of buttery crumb topping and tangy-sweet cherry filling, each bar offering a playful crunch and juicy burst. A golden base of tender crumbs holds a simmered cherry filling that bubbles with tart sweetness, and an extra crisp topping delivers that signature crunch with every bite. Ideal for easy summer baking, this beginner-friendly dessert is ready to impress at picnics, potlucks, or just a cozy night in.
Key Ingredients
To whip up these Cherry Crumb Bars, you'll need a handful of pantry staples and fresh cherries. Each component plays a key role in creating that signature buttery crunch and juicy filling:
- 2 cups all-purpose flour: The sturdy base that forms the tender crumb structure.
- 1/2 cup granulated sugar: Sweetens the dough and balances the cherries' tartness.
- 1/2 teaspoon salt: Enhances flavors throughout the crumb and filling.
- 1 teaspoon baking powder: Adds just enough lift to create a light, sandy texture.
- 1 cup unsalted butter, cold and cubed: Provides rich fat to create flaky, buttery crumbs.
- 4 cups pitted fresh cherries: The star ingredient delivering juicy, tangy-sweet fruitiness.
- 1/2 cup granulated sugar: Sweetens the cherry filling and helps it set.
- 2 tablespoons cornstarch: Thickens the cherry juice into a jammy consistency.
- 1 teaspoon fresh lemon juice: Brightens the filling with a hint of acidity.
How To Make Cherry Crumb Bars
These Cherry Crumb Bars come together in three straightforward stages: building the crumb base, cooking the cherry filling, and layering them before a golden bake. With simple techniques like whisking, cutting in cold butter, and simmering the fruit mixture, you’ll create bars that are crisp on top, tender below, and bursting with cherry goodness.
1. Preheat the oven to 350°F (175°C) and line an 8×8-inch baking pan with parchment paper. This helps the bars bake evenly and makes them easy to lift out when they’re done.
2. In a large bowl, whisk together 2 cups all-purpose flour, 1/2 cup granulated sugar, 1/2 teaspoon salt, and 1 teaspoon baking powder until fully combined.
3. Cut cold, cubed butter into the flour mixture using a pastry cutter or fork, working quickly until you see pea-sized crumbs spread throughout the dough.
4. Reserve 1 1/2 cups of this crumb mixture for topping, then press the remaining crumbs firmly into the bottom of the prepared pan using the back of a spoon or your fingers to form an even crust layer.
5. In a medium saucepan, combine 4 cups pitted fresh cherries, 1/2 cup granulated sugar, 2 tablespoons cornstarch, and 1 teaspoon fresh lemon juice. Cook over medium heat, stirring constantly until the mixture thickens and bubbles, about 5 minutes.
6. Spread the hot cherry filling evenly over the crust layer, ensuring full coverage for uniform bites.
7. Sprinkle the reserved crumbs over the cherry layer, distributing them evenly so every corner gets a crunchy topping.
8. Bake in the preheated oven for 30 to 35 minutes, or until the crumbs on top turn a golden brown.
9. Remove from oven and allow the bars to cool completely in the pan. Once cooled (and chilled if desired), gently lift the parchment to remove and cut into squares.
Serving Suggestions
These Cherry Crumb Bars are versatile and delicious on their own, but a few simple touches can elevate them for any occasion. Whether you’re aiming for a casual snack or a dessert centerpiece, these serving ideas will help you highlight the buttery crumbs and juicy cherries just right.
- A la mode magic: Serve each bar warm with a scoop of vanilla ice cream so the cold cream melts into the crumb for a dreamy contrast.
- Powdered sugar dust: Lightly sift powdered sugar over the cooled bars just before serving for a pretty finish and a hint of extra sweetness.
- Whipped cream pairing: Top with a dollop of fresh whipped cream flavored with a drop of vanilla or almond extract to complement the fruitiness.
- Fresh mint garnish: Add a sprig of mint on each plate to cut through the sweetness and introduce a refreshing pop of color.
Tips For Perfect Cherry Crumb Bars
Let’s get those Cherry Crumb Bars just right from the very first batch! These insider notes will help you achieve clean slices, maintain optimal freshness, and even experiment with fun variations. With these friendly tips, you’ll feel like a crumb-topping pro in no time—no crumb left behind, guaranteed!
- For easier cutting, chill the bars in the refrigerator for 1 hour before slicing.
- Store leftover bars in an airtight container at room temperature for up to 3 days.
- Frozen cherries can be used; thaw and drain excess liquid before cooking.
- You can add a pinch of cinnamon to the crumb mixture for extra warmth.
How To Store It
Keeping these Cherry Crumb Bars fresh is easy and lets you enjoy their buttery crumble and juicy filling over several days. With the right storage methods, you can preserve both texture and flavor, whether you’re planning ahead for a gathering or saving treats for yourself.
- Room Temperature: Store cooled bars in an airtight container at room temperature for up to 3 days. Place a sheet of parchment between layers to prevent sticking.
- Refrigeration: For longer freshness, seal bars in a container and chill in the fridge for up to 5 days. Bring to room temperature or warm slightly before serving to revive the crumb texture.
- Freezing: Wrap individual bars tightly in plastic wrap or place in a freezer bag and freeze for up to 1 month. Thaw overnight in the fridge or at room temperature before enjoying.
- Layer Separation: When stacking bars, use parchment paper to separate layers—this keeps the topping and filling intact for neat slices later on.
Frequently Asked Questions
Got questions about making or serving Cherry Crumb Bars? Here are answers to the most common queries.
- Q: How long does it take to prepare and bake these Cherry Crumb Bars?
The total time is about 1 hour and 15 minutes. This includes 15 minutes of prep—measuring ingredients, pitting cherries, and cutting cold butter into the flour—and roughly 5 minutes of cooking the cherry filling on the stovetop. Baking takes 30 to 35 minutes, followed by at least 15 minutes of cooling in the pan before you can lift the bars out, plus an optional 30 to 60 minutes of chilling for cleaner slicing.
- Q: Can I use frozen cherries instead of fresh?
Yes, you can substitute frozen cherries. Thaw them completely, then drain off any excess liquid to prevent a watery filling. Follow the same steps for cooking the fruit mixture; it may release more juice, so keep the cornstarch measurement the same to ensure proper thickening. If the mixture seems too runny, let it simmer a minute or two longer until it bubbles and coats the spoon.
- Q: How can I get well-defined, even crumb topping?
For pea-sized crumbs, make sure your butter is cold and cut into small cubes. Use a pastry cutter, fork, or two knives to work the butter quickly into the flour mixture until the texture resembles coarse meal with some larger pieces. If the mixture becomes too warm, pop it in the fridge for 5–10 minutes before reserving crumbs and pressing the base layer. Chilling the assembled bars for at least an hour after baking helps the topping set and hold its shape when cut.
- Q: What’s the best way to slice the bars without them crumbling?
For clean cuts, chill the fully cooled bars in the refrigerator for at least 1 hour. Use a sharp, large chef’s knife and press straight down without sawing. Wiping the knife blade with a damp cloth between cuts removes crumbs and prevents tearing. If you’d like pretty uniform squares, mark the surface lightly with the knife before cutting all the way through.
- Q: Can I make these bars ahead of time or freeze them?
You can absolutely prep ahead or freeze. After baking and cooling completely, wrap the whole pan tightly with plastic wrap or transfer bars to an airtight container. Store at room temperature for up to 3 days or freeze for up to 1 month. To serve frozen bars, thaw overnight in the fridge or let them sit on the counter for 30 minutes before slicing.
- Q: How can I adjust sweetness or add extra flavor?
If your cherries are very tart, you can increase the sugar in the filling to 2/3 cup. For warmth, stir a pinch (about 1/4 teaspoon) of ground cinnamon or a dash of nutmeg into the dry crumb mixture. You can also add a teaspoon of vanilla extract to the cherry filling off the heat for additional depth. Taste the cooked filling before assembling and adjust sugar or spices as needed.
- Q: Is it possible to make these bars gluten-free?
Yes, you can use a 1-to-1 gluten-free flour blend in place of all-purpose flour. Be sure your blend contains a binding agent like xanthan gum; if not, add 1/4 teaspoon xanthan gum. Since gluten-free flours can absorb moisture differently, you may need to chill the dough a bit longer if it seems too soft when cutting in the butter. Otherwise, follow the recipe as written for the best results.
What Makes This Special
These Cherry Crumb Bars are the perfect mix of buttery, sandy crumbs and vibrant cherry filling that make every bite a celebration of summer flavors. The crisp topping and jammy center work in harmony—no wonder they’re such a crowd-pleaser. Whether you’re a beginner baker or a crumb connoisseur, this simple recipe never disappoints. Feel free to print or bookmark this guide for future baking adventures. Drop a comment below if you give it a try or have any questions—let’s keep the cherry love going!
Print
Cherry Crumb Bars
- Prep Time: 25 mins
- Cook Time: 35 mins
- Total Time: 1 hour
- Yield: 16 servings
- Category: Desserts
Description
A golden base of tender crumbs holds a simmered cherry filling that bubbles with tart sweetness. Topped with extra crisp crumbs, these bars deliver a satisfying crunch and juicy pop in every bite.
Ingredients
- 2 cups all-purpose flour
- 1/2 cup granulated sugar
- 1/2 teaspoon salt
- 1 teaspoon baking powder
- 1 cup unsalted butter cold, cubed
- 4 cups pitted fresh cherries
- 1/2 cup granulated sugar
- 2 tablespoons cornstarch
- 1 teaspoon fresh lemon juice
Instructions
- Preheat the oven to 350°F and line an 8×8-inch baking pan with parchment paper.
- In a large bowl, whisk together flour, 1/2 cup sugar, salt, and baking powder.
- Cut cold butter into the flour mixture using a pastry cutter or fork until pea-sized crumbs form.
- Reserve 1 1/2 cups of the crumb mixture, then press the remaining crumbs firmly into the bottom of the prepared pan.
- In a medium saucepan, combine cherries, 1/2 cup sugar, cornstarch, and lemon juice and cook over medium heat until the mixture thickens and bubbles, about 5 minutes.
- Spread the cherry filling evenly over the crust layer.
- Sprinkle the reserved crumbs over the cherry layer, covering it as evenly as possible.
- Bake for 30 to 35 minutes, or until the top is golden brown.
- Allow the bars to cool completely in the pan before lifting them out and cutting into squares.
Notes
- For easier cutting, chill the bars in the refrigerator for 1 hour before slicing.
- Store leftover bars in an airtight container at room temperature for up to 3 days.
- Frozen cherries can be used; thaw and drain excess liquid before cooking.
- You can add a pinch of cinnamon to the crumb mixture for extra warmth.